Troubleshoot MongoDB Atlas
Limit of one free cluster.
When creating a new site or migrating (usually not the first attempt), when reaching Target Cluster.

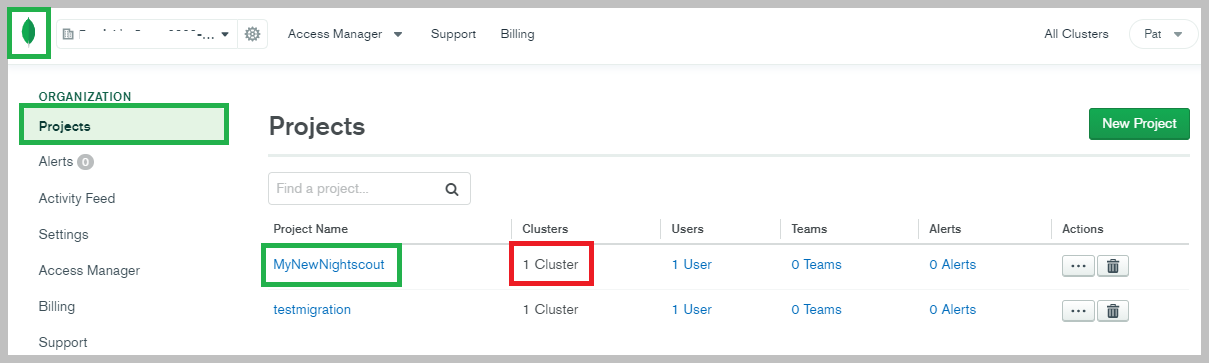
Click the leaf top left in your Atlas account. Look at the
Project Nameyou wanted to use when creating your new cluster, it shouldn’t contain a cluster yet (like the example below, I tried to create a new Nightscout site but there is already a cluster inside the project I wanted to use). You can’t have two clusters in a free project. Click yourProject Name.This should not happen in normal conditions. Before deleting a cluster, check it doesn’t contain your data!
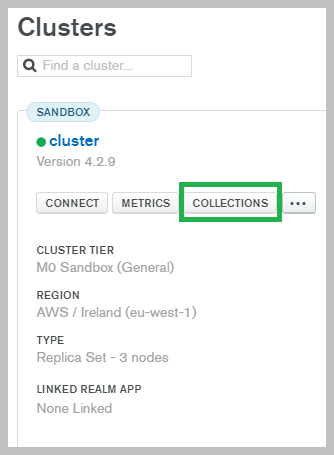
Click on
Collectionsin the cluster you selected.
Click on
entries
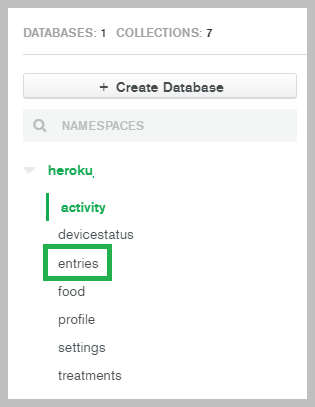
In the case there is data, like in the example below, don’t use this cluster. Leave it like this and create a new one.
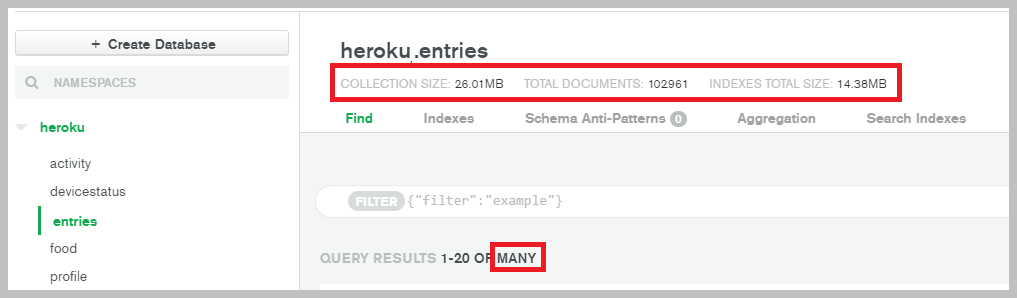
If there no data, you can safely delete it.
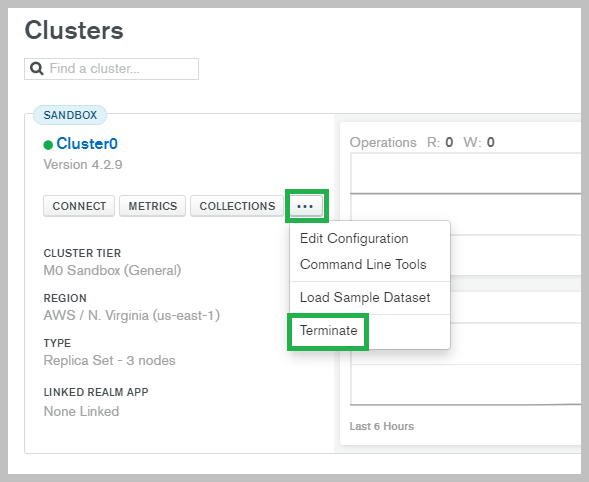
In this cluster you want to delete click
...thenTerminate
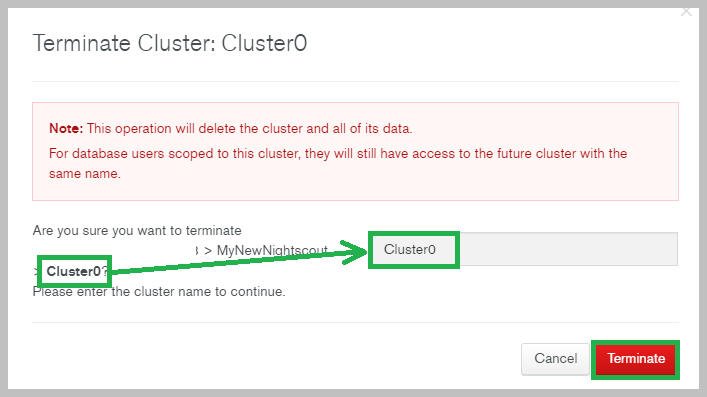
Copy the cluster name to confirm then click
Terminate
Wait until the operation completes.
You can now use this project name to create a new site.
Meet your connection string
For technical details look here.
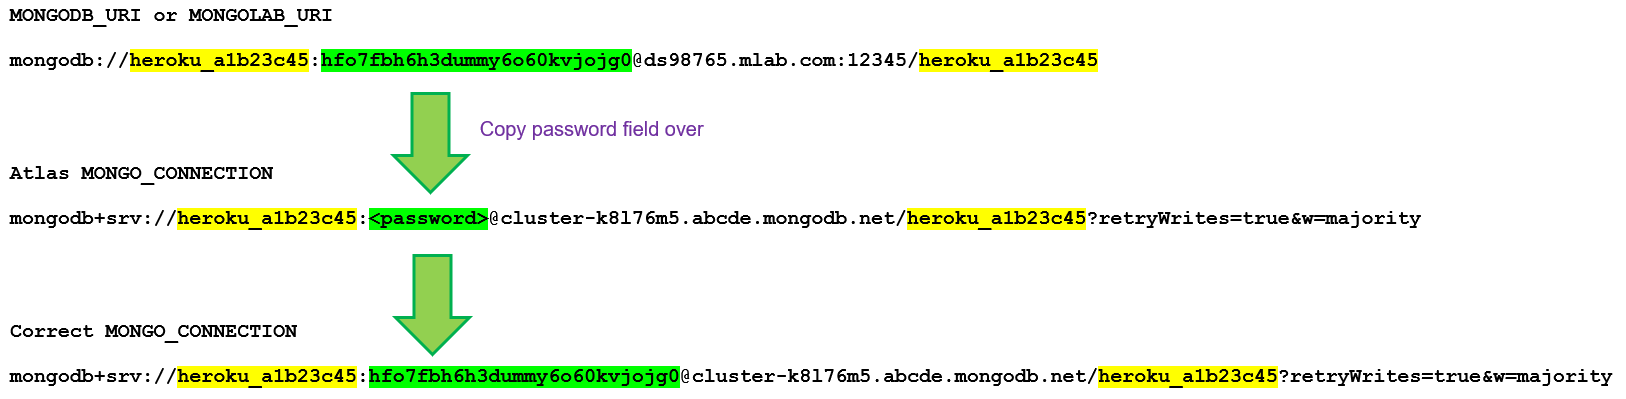
A typical mLab migrated string will look like this:
mongodb+srv://heroku_0v50k8rf:ddfsjcpfu8fcoj9n6dueabfd5u@cluster0.g03wh.mongodb.net/
heroku_0v50k8rf?retryWrites=true&w=majority
A typical new string created with Atlas will look like this:
mongodb+srv://johndoe:V3ry53cr3t@cluster0.a01bc.mongodb.net/myCGMiC?retryWrites=true&w=majority
It will start by
mongodb+srv://withmongodba standard prefix for a connection string, and+srvadding a security layer.After
://you’ll find your database username, that is not your Atlas account username. In the examples aboveheroku_0v50k8rforjohndoe.Following the username, a separator
:and your database password that is not your Atlas account password. In the examples above a typical 26 characters password created automatically with the mLab add-onddfsjcpfu8fcoj9n6dueabfd5uand a user created passwordV3ry53cr3t.Following the password, a separator
@then the host name that was provided by Atlas after you created you cluster. typically it will look likecluster0.a1b2c3.mongodb.net[Optional] After the host name and the separator
/you’ll see your Nightscout database name. If you migrated from mLab it will be identical to your database username (unless you modified it). If you created your Atlas cluster it will be the one you decided. In the examples aboveheroku_0v50k8rformyCGMiC.Another separator
?and you’ll see two options:retryWrites=true&w=majority
Unable to connect to Mongo
Common reasons:
The database is not available. If you don’t have a database yet, create a new one.
If you do have a database, check it’s functional then restart your web app:
Your Atlas connection string is incorrect. Check here.
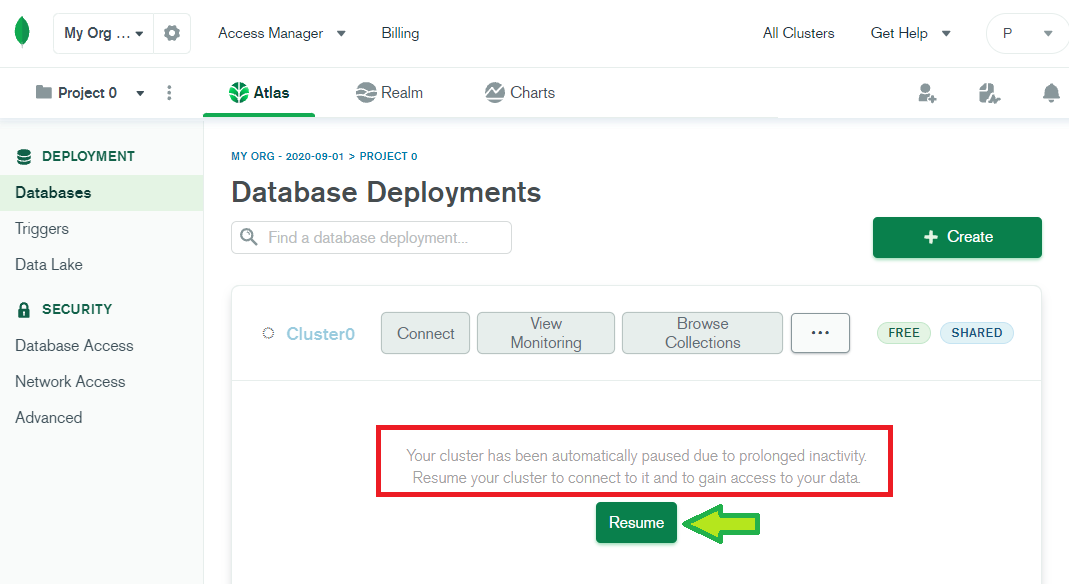
MongoDB paused
If you haven’t been using Nightscout for a while but it was working before, check the database didn’t go to sleep mode. If it did, select
Resumeto restart it.Once done:
If you see this message
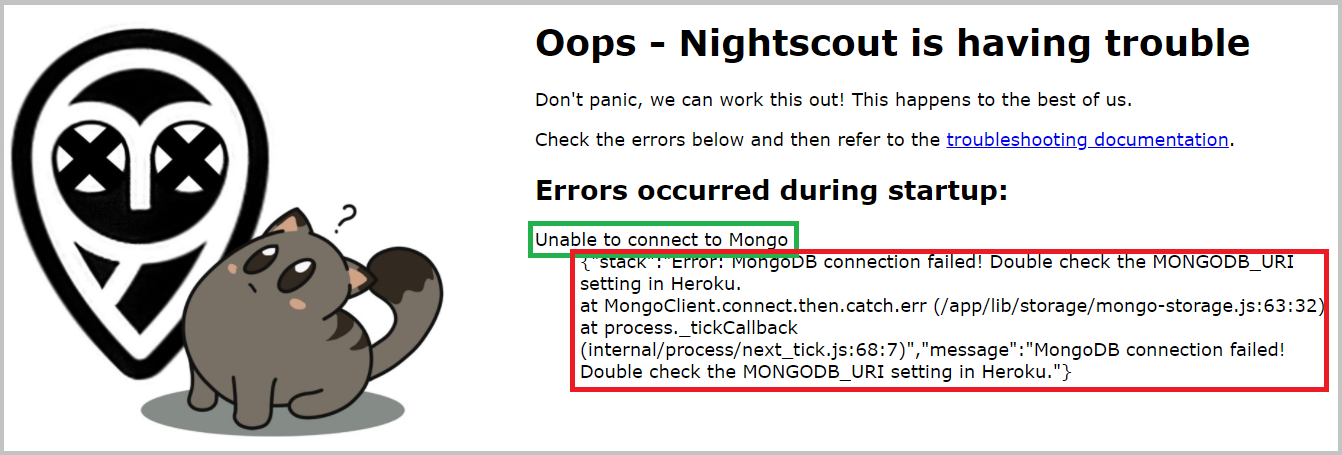
Update to latest version and come back after you have a more accurate error message.
MongoDB in read only mode
If you see this message:
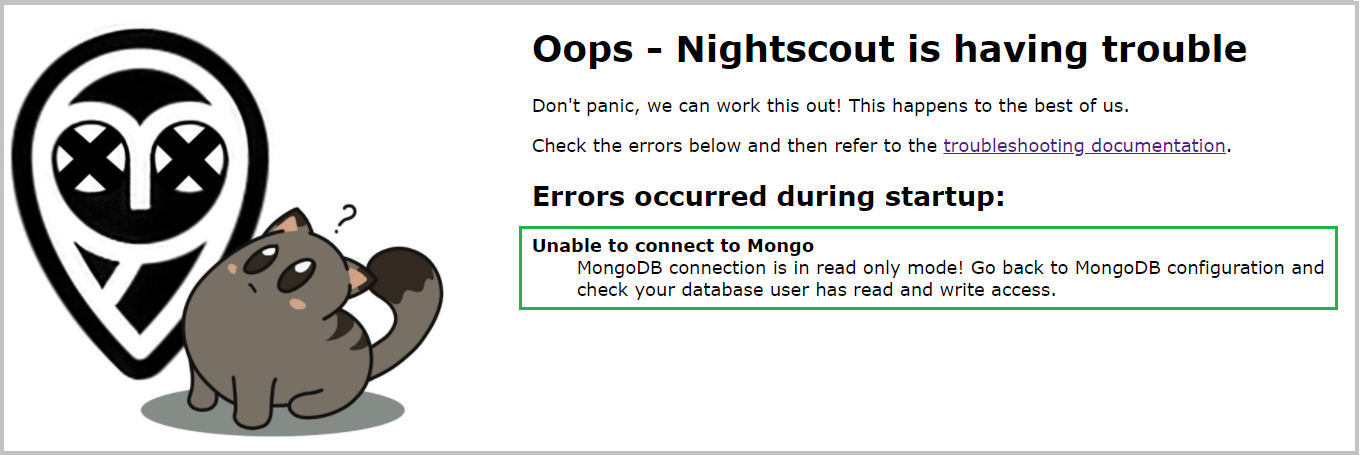
Verify your database is not read only, else click
Edit
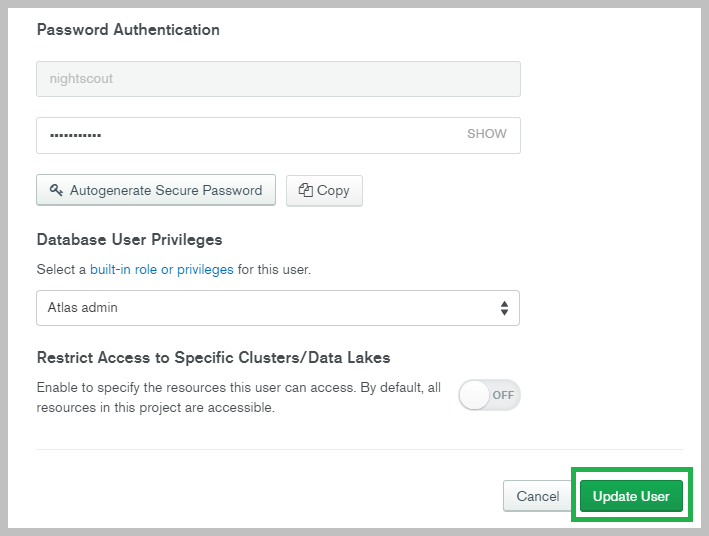
Change the permissions to
Atlas AdminandUpdate User
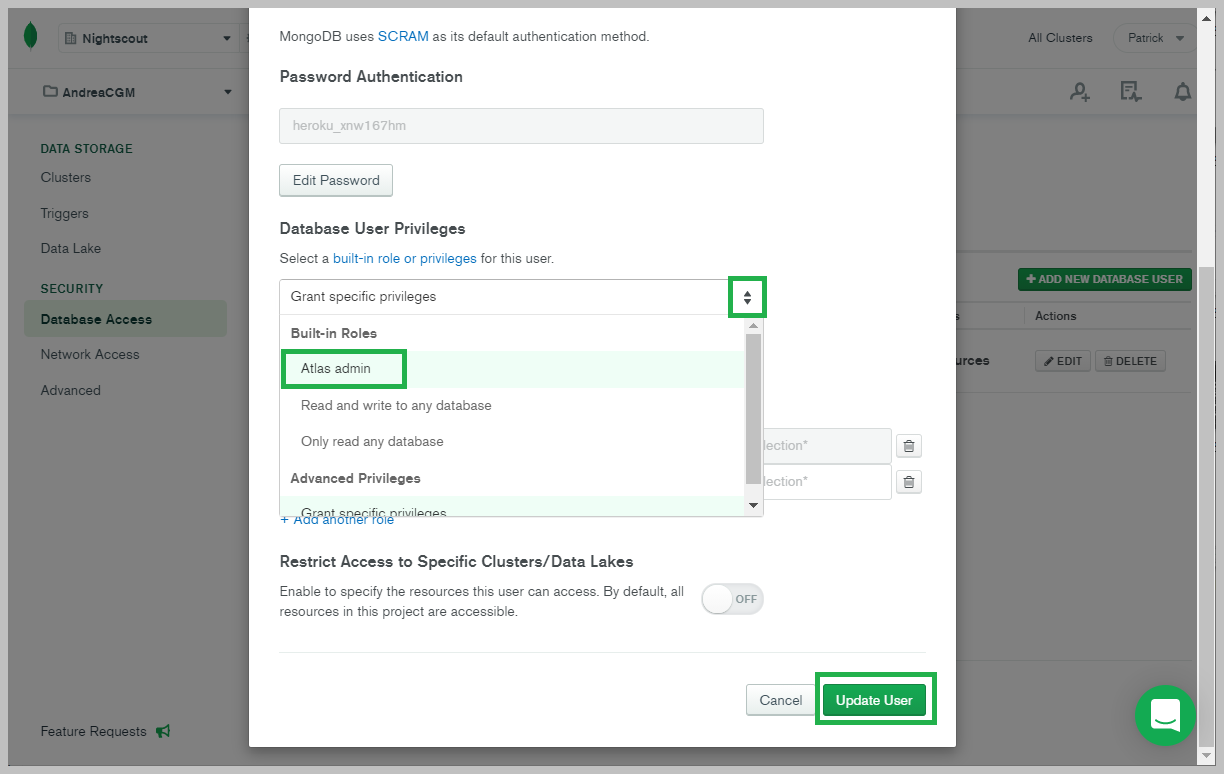
Once done:
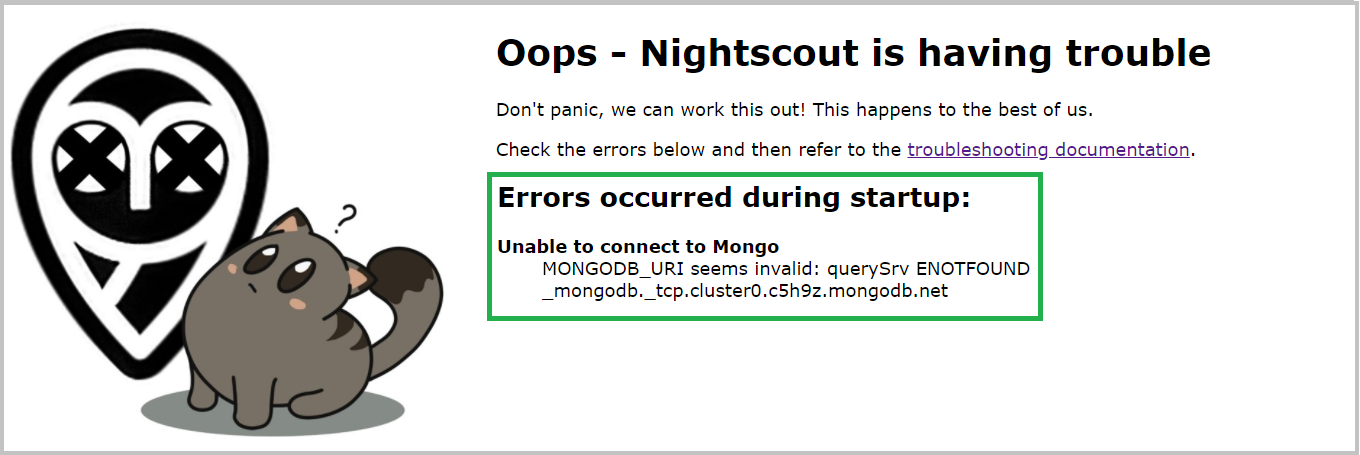
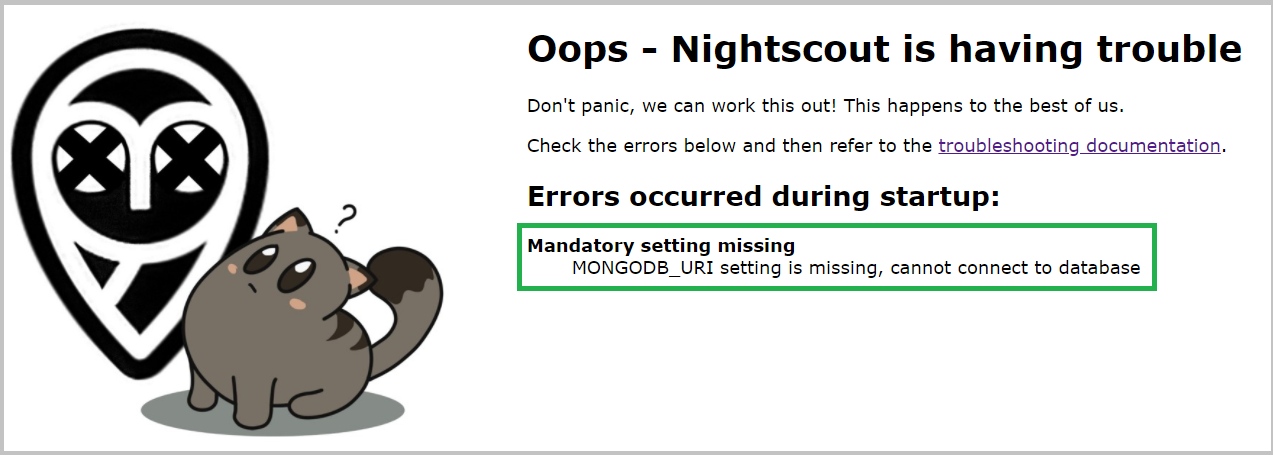
MONGODB_URI missing
If you see this message:
If you don’t have a database yet, create a new one.
It might be a transient error in MongoDB Atlas, try to restartyour web app:
Check your database is not full!
If your Nightscout was still functional after November 11th 2020, continue below to recover:
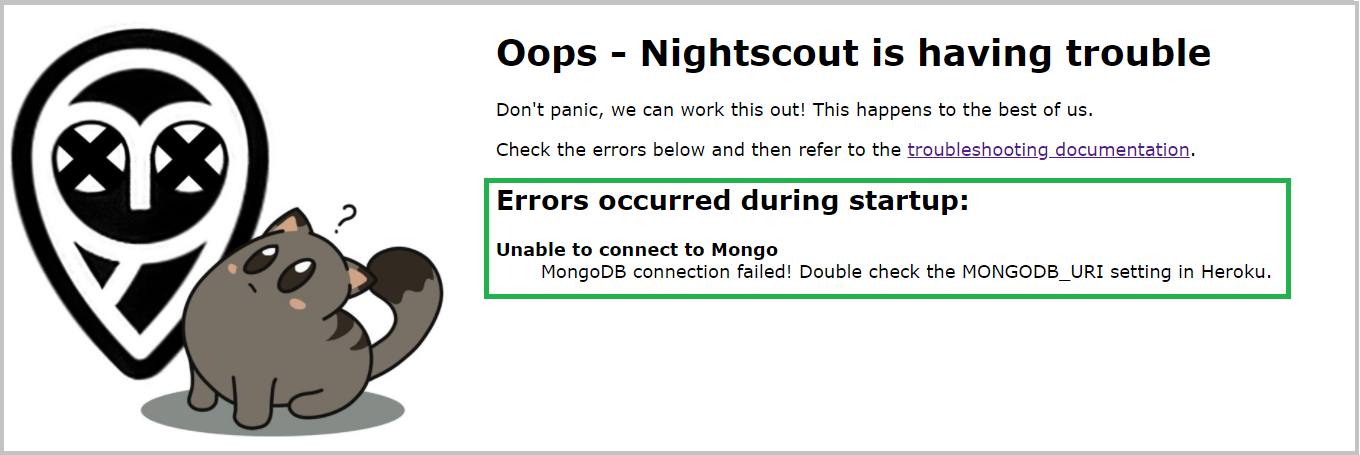
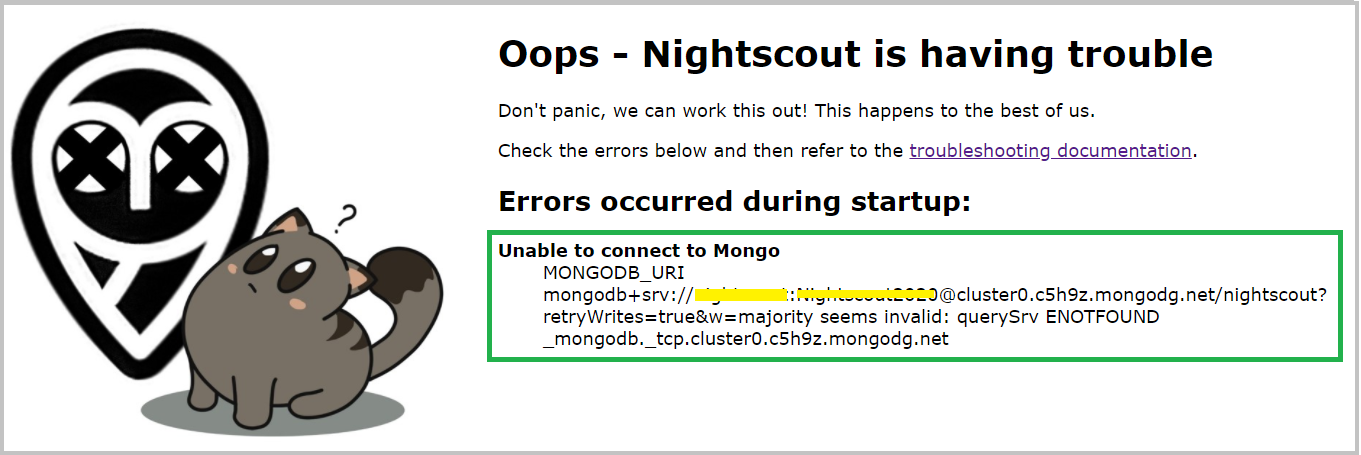
Generic Unable to connect to Mongo
If you see this message:
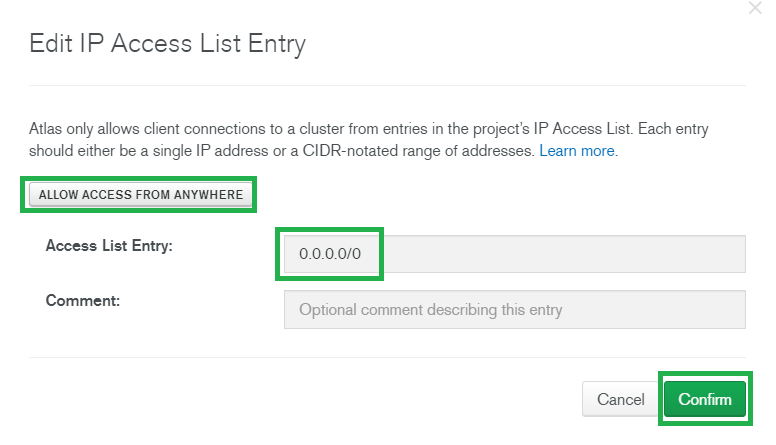
Check you authorized all IPs to access your Atlas database:
Open your Atlas cluster and select your Nightscout project, then
Network access
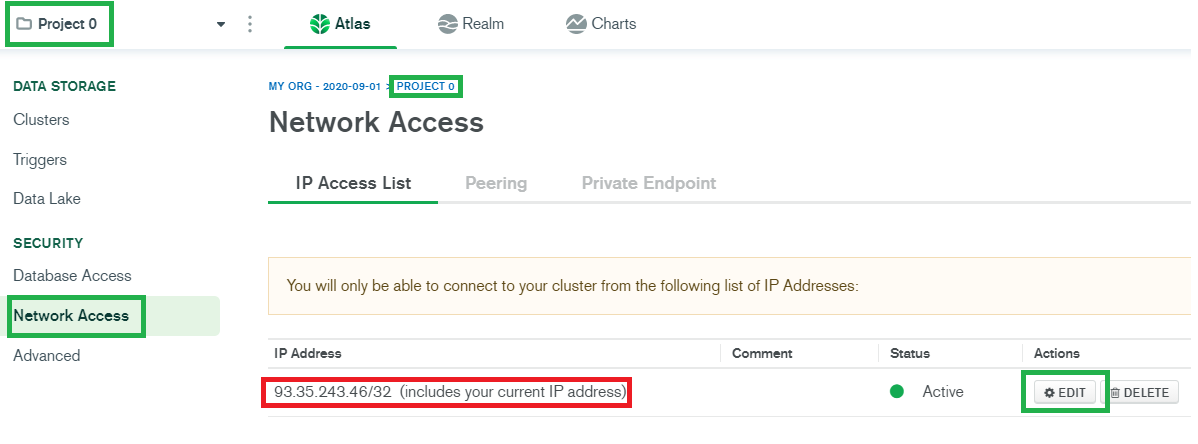
If you see an IP (in red above) instead of 0.0.0.0/0 click
EditselectALLOW ACCESS FROM ANYWHEREthenConfirm.
Once done:
Bad connection string
If you see this message:
Edit your Nightscout configuration and search for a variable called
MONGODB_URIorMONGO_CONNECTION.If you find none, go here.
MONGODB_URI or MONGO_CONNECTION
There should be at least one and only one of them, not both.
If you migrated from mLab Heroku add-on it is usually MONGO_CONNECTION
if you deployed a brand new Nightscout it should be MONGODB_URI
Verify it is looking like this:
mongodb+srv://atlasusername:atlaspassword@cluster0.zzzzz.mongodb.net/dbname?retryWrites=true&w=majority
Note that your atlasusername, atlaspassword and dbname will be different from the example above.
Paste the string in the box below:
Click the
Analyzetext below:
Analysis result will appear here.
If the analysis result doesn’t show any error, check below the data is what you actually wanted:
Database Username:
…
Database Password:…
Database name:…
(No database name is not an error)Hint
If you migrated from Heroku mLab add-on, your database username and database name should be identical.
If you’ve just created a new site, try to use this help page to verify or recreate it.
If you’re still in trouble continue below:
Recover your connection string
If you’ve tried several times to deploy or migrate, you might end-up with many useless items in your accounts. At this point, you could benefit doing some cleanup in order to identify the correct Atlas database you want to connect to. Consider cleanup before continuing.
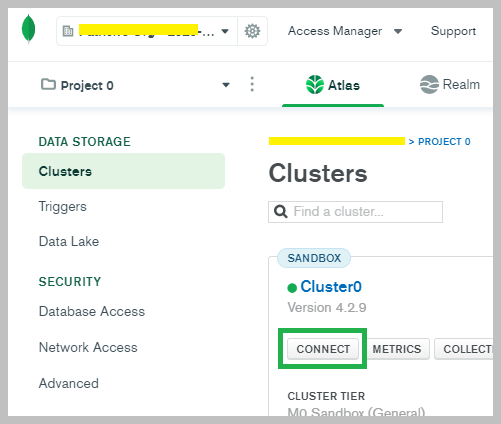
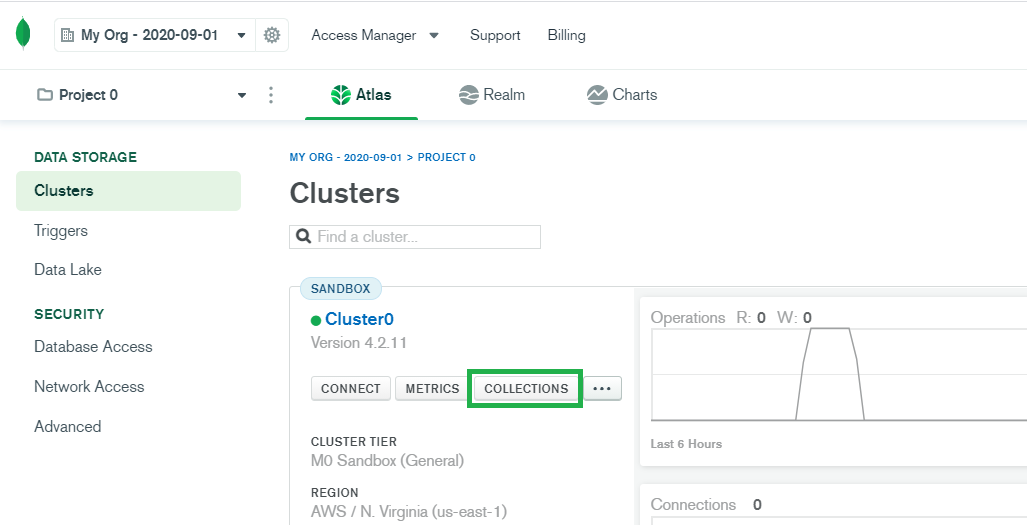
a) Go to your MongDB account. Log in if necessary https://cloud.mongodb.com/
b) Click Connect below your cluster name (in the example below Cluster0, but it might have another name)
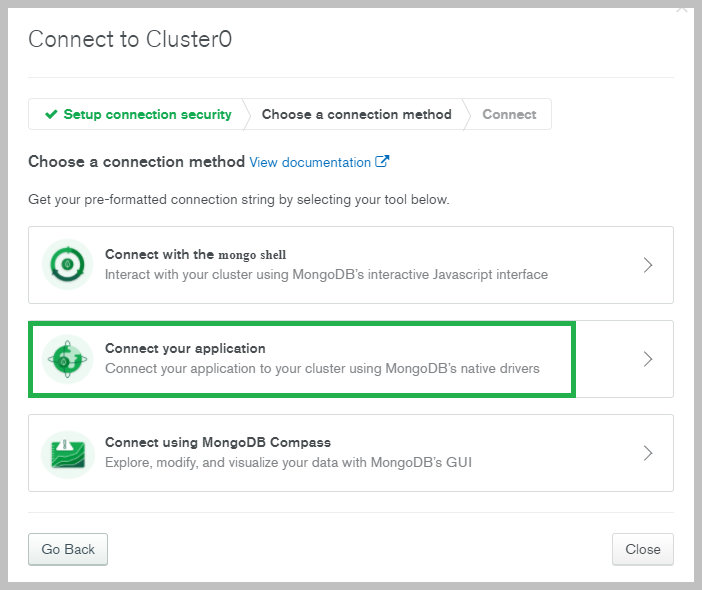
c) Click Connect your application
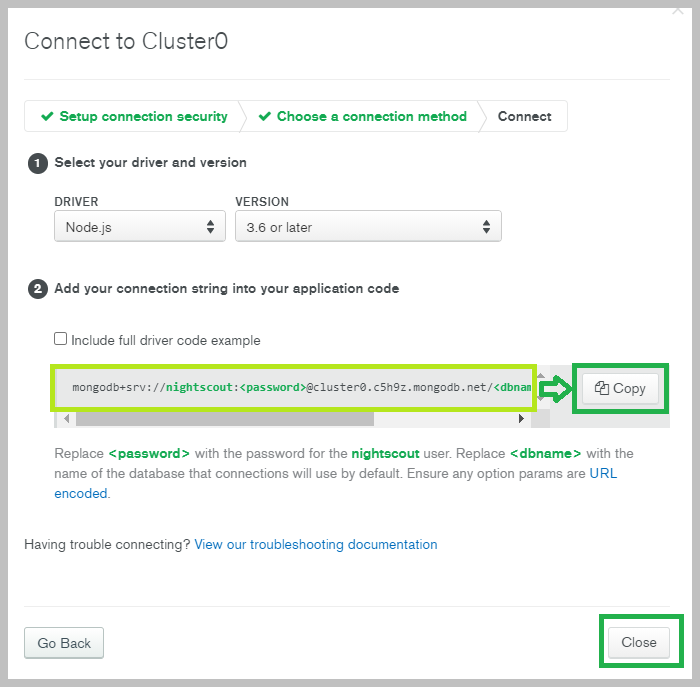
d) A new view opens, in (2) Add your connection string into your application code you will find your MONGODB_URI or MONGO_CONNECTION string.
Click Copy then Close
e) Paste it into a place where you can edit the text (i.e. a Word or a Notepad document).
Edit your string so that you add the database user password after the database user info. You defined them during your MongoDB Atlas database creation, when you reached step e).
Here’s an example of how the string is built up (myFirstDatabase might not show, this is normal):
mongodb+srv:// nightscout :<password>@cluster0.xxxxx.mongodb.net/myFirstDatabase?retryWrites=true&w=majority
f) Edit your string in order to replace <password> with your database password.
g) If you don’t remember your Atlas database password (which should not be your mongoDB Atlas account password) invent a new one (only letters and numbers).
Your string will now look like this: (do not use the same password as the example). Note there are no remaining < and >.
If you don’t see a database name like myFirstDatabase before the question mark, just ignore it.
mongodb+srv://nightscout:soo5ecret@cluster0.xxxxx.mongodb.net/myFirstDatabase?retryWrites=true&w=majority
h) Copy this resulting string above into your MONGODB_URI or MONGO_CONNECTION variable. There must be only one of these variables, not both.
See here how to edit your configuration variables.
i) If there is neither one nor the other create a new MONGODB_URI variable and paste the string in the value field.
j) If you remembered your password restart your web app, and you should be done.
k) If you changed your password or your Nightscout page still fails to open continue.
Change your Atlas database password
If you changed the password in the string you will need to change it in the database too:
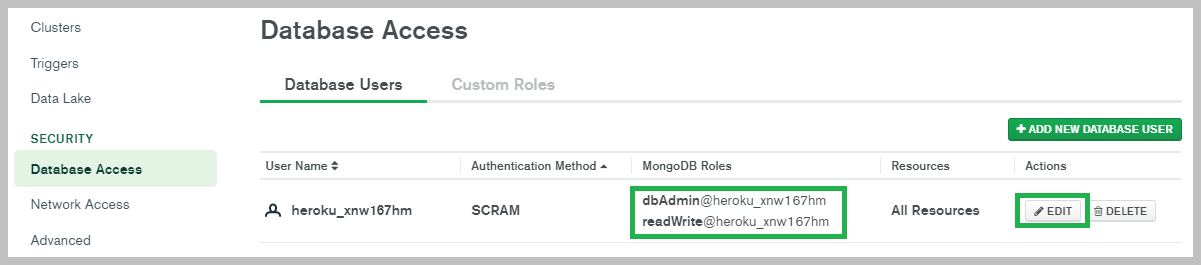
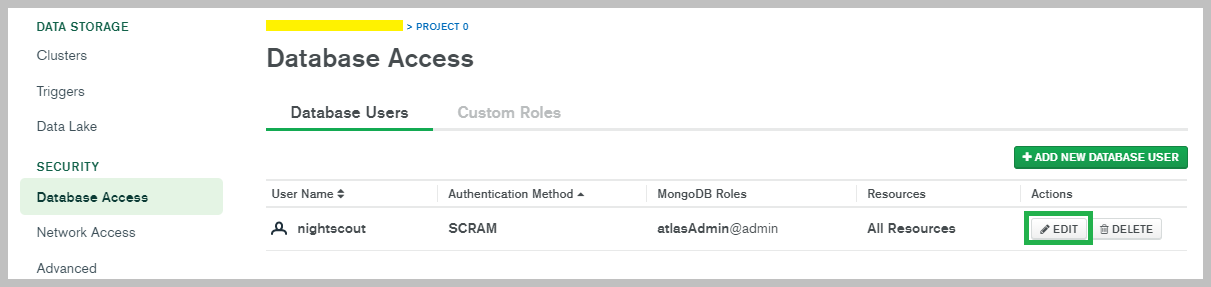
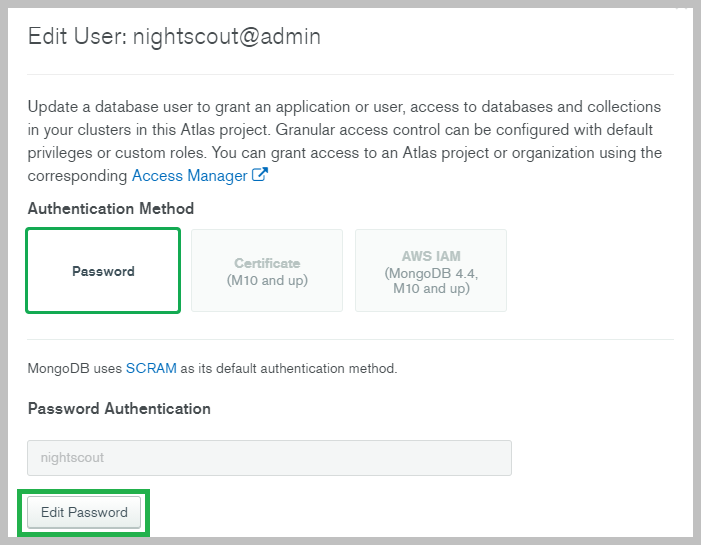
Click
Database Access

At the end of the line, click
Edit
In
PasswordclickEdit Password
Hint
Take a look at the top of this view, after Edit User you can see your database user name before @. Check it’s matching the one in your connection string.
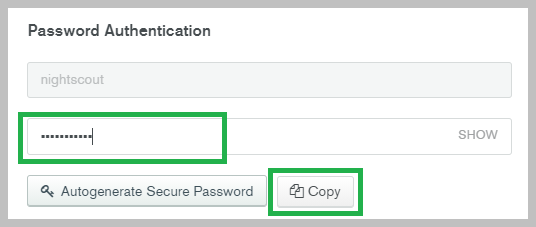
If you forgot your password invent a new one (use only letters and numbers: no special characters) or better: use
Autogenerate Secure Passwordand clickCopyElse make it the same than the one in your
MONGODB_URIconnection string variable
Click
Update User
Make sure the password matches in your connection string variable
MONGODB_URIorMONGO_CONNECTION
Database full
Free databases like M0 Sandbox provided by Atlas will only hold a limited amount of data (512MB) and you will eventually need to manually cleanup. You can extend the capacity to 2 and 5GB paying for an M2 or M5 Shared cluster.
Note: If you consider paying for a database upgrade, also think about a paid hosting service.
Warning
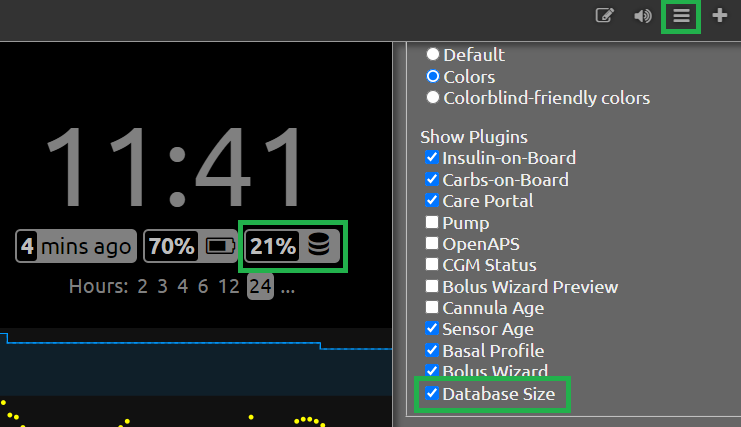
Make sure your Nightscout site has Database Size enabled to monitor database capacity.
In order to have the database size pill, add dbsize in the ENABLE variable.
Look here for more information on this plugin.
Hint
Your database size might not decrease immediately (it might even increase temporarily) after you perform cleanup with Admin Tools (see below: Normal cleanup). Allow a few hours to see the effects. In the meantime your site should recover functionality.If your site keeps crashing, go ahead to emergency cleanup.
Restart
Try to recover temporary access to Nightscout to perform normal cleanup:
The probability your database is full is very low, make sure you selected the maximum disk size for your compute engine. See Here.
Contact your provider. The probability your database is full is virtually null.
Normal cleanup
You can cleanup (enter the number of days to keep) or delete your devices status (recommended as a first recovery action):
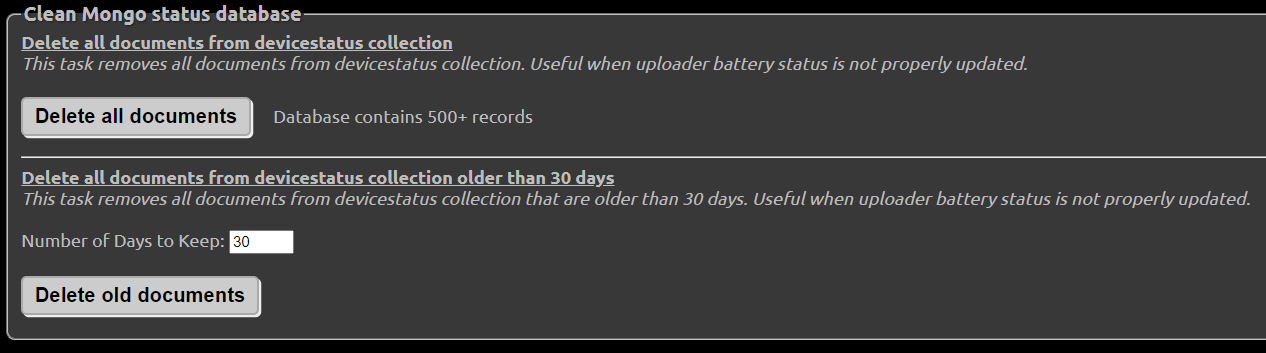
Same for Treatments:

And Glucose entries. If you are reluctant to lose historical data you should consider opting for a paid database solution or hosted Nightscout.

If your Nightscout page doesn’t open after restarting your app and you want to rule out a full database, you can try an emergency cleanup of the less important part of your Nightscout site: devicestatus.
Emergency cleanup
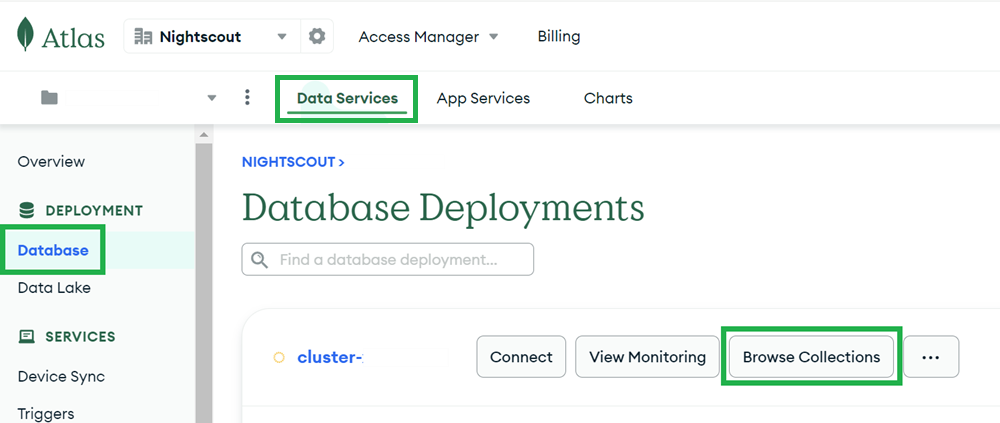
Log in Atlas
Open your Nightscout database and select
Browse collectionsinDatabase
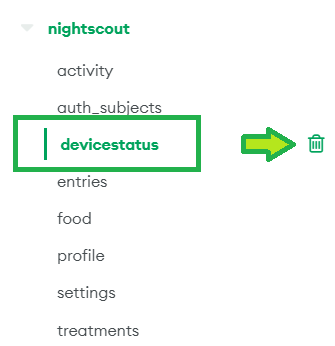
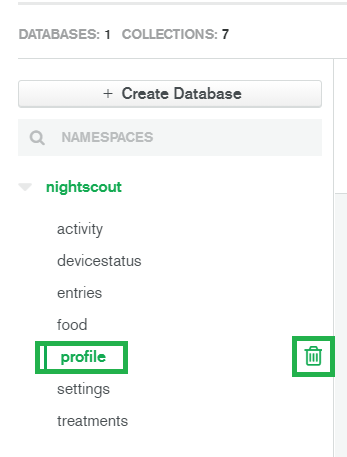
Select the
devicestatuscollection and click the bin icon to delete it.You will lose all device status history (battery, ..) but you won’t lose neither BG, treatments nor profiles.
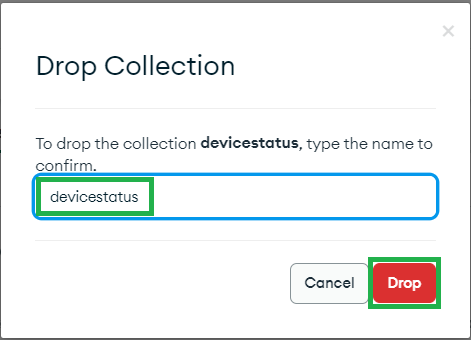
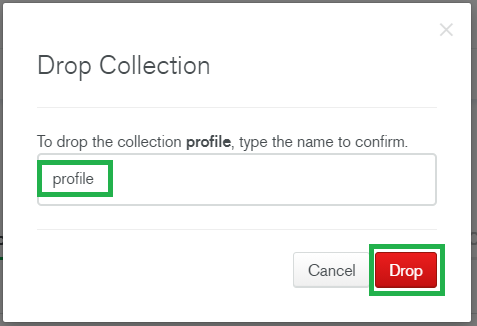
Write
devicestatusin the box then clickDrop
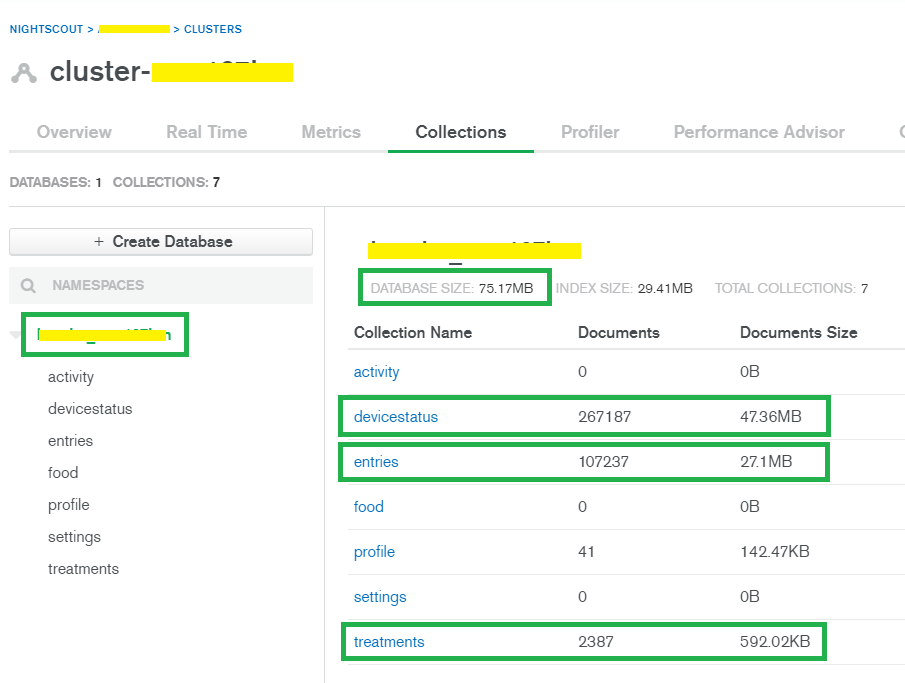
Atlas database size verification
Log in Atlas
Open your Nightscout database and select
Collections
Click your database name (hidden left). Check the
DATABASE SIZEis indeed close to or at the limit (512MB) then look at these three collectionsDocuments size:devicestatus,entriesandtreatments.
Open Nightscout
Admin tools. If your site doesn’t open jump to Emergency cleanup.Depending on the collection you identified above, choose which of the following you want to cleanup.
Reports slow loading or timeout
Loopers might experience Nightscout taking an extremely long time or even timing out when creating reports due to the profiles collection database growing too big.
Two solutions are available:
Follow this video (set it full screen in 720p) to selectively delete profiles https://www.youtube.com/watch?v=iipp0MfPKNQ
Delete all profiles in Atlas
Log in to Atlas https://account.mongodb.com/account/login
Select your cluster then COLLECTIONS
Select the profile collection and click the bin icon to delete all profiles.
Write profile in the box then click Drop
Open your Nightscout and create a new profile (mind the time zone!), authenticate and save it.
If you are using Loop, temporarily change a basal rate in Loop, and confirm your profiles now show up in Nightscout.
Data in the future
First try to remove future items with the Admin Tools.
If it doesn’t give the expected result:
Check in Atlas
Open your Nightscout cluster and select
Collections
In
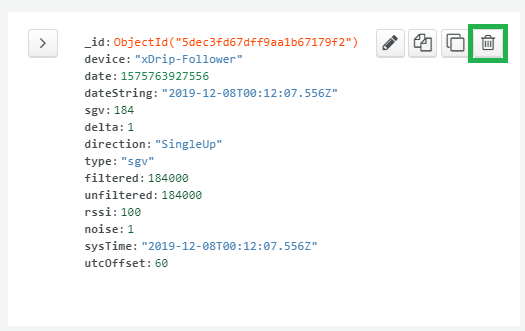
Entriestype{date:-1}and clickFind
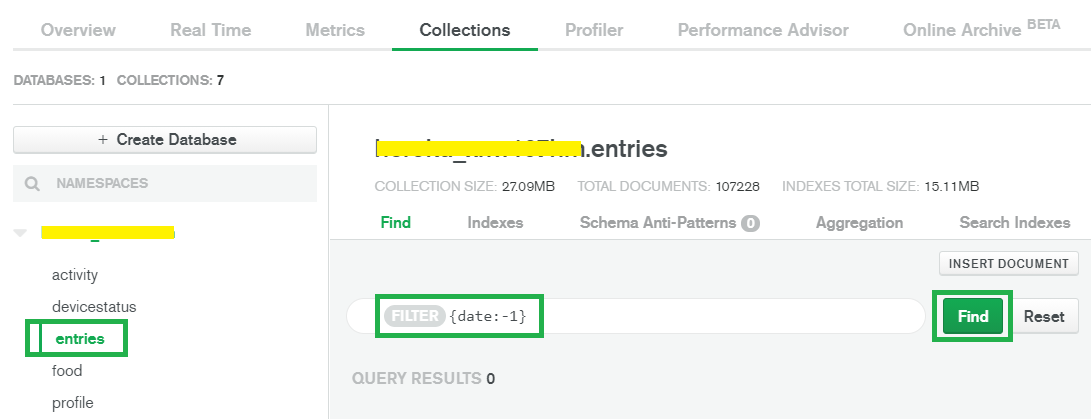
Delete the entries in the future (manually) with the bin icon
Cleanup
It is very easy to get lost in Atlas.
The structure from top to bottom is: Organization, Projects and Databases. You can have several organizations, each of them several projects and each of them several databases.
Hint
If you are deploying a brand new Nightscout make sure you have one organization, one project and one cluster created. No more no less.
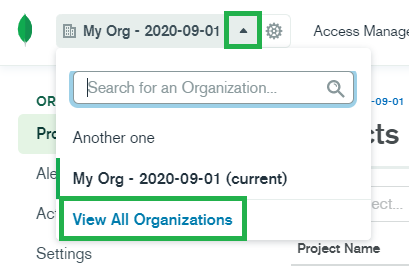
If you want to cleanup Atlas, unless you don’t have data, you must first find out which database contains your data. For this, start from View All Organizations:
You can delete empty organizations (those without any project inside).
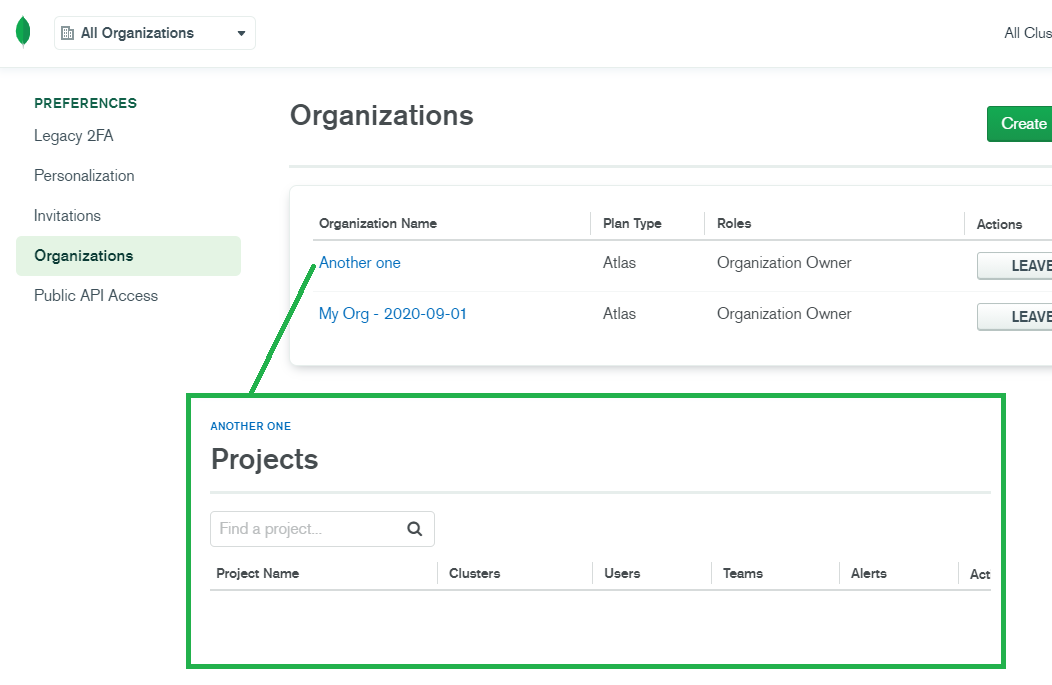
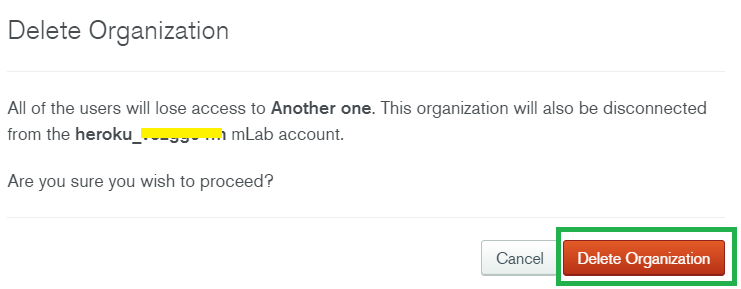
Select the organization, then top left the cog wheel to go in Settings, then scroll down to Delete Organization: Delete.

Deleting an organization without projects will not delete your data.
Once inside an organization, you will see its projects. You can safely delete projects without clusters.
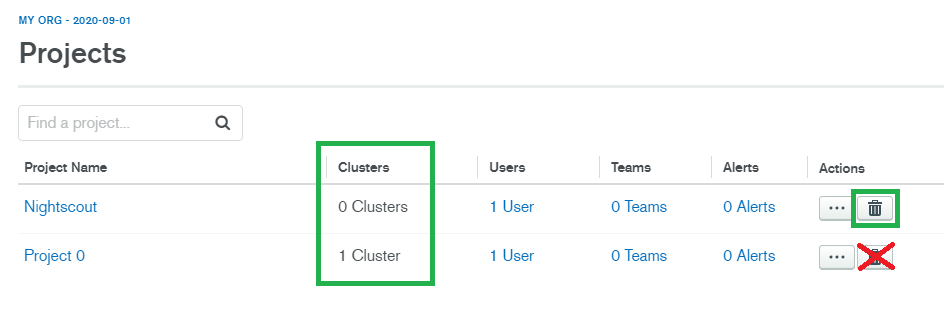
Deleting an empty project doesn’t delete your Nightscout data.
For non-empty projects continue reading before deciding to delete them.
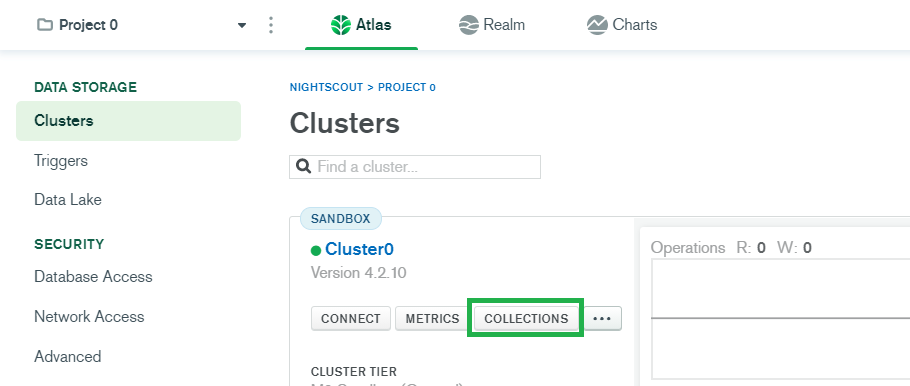
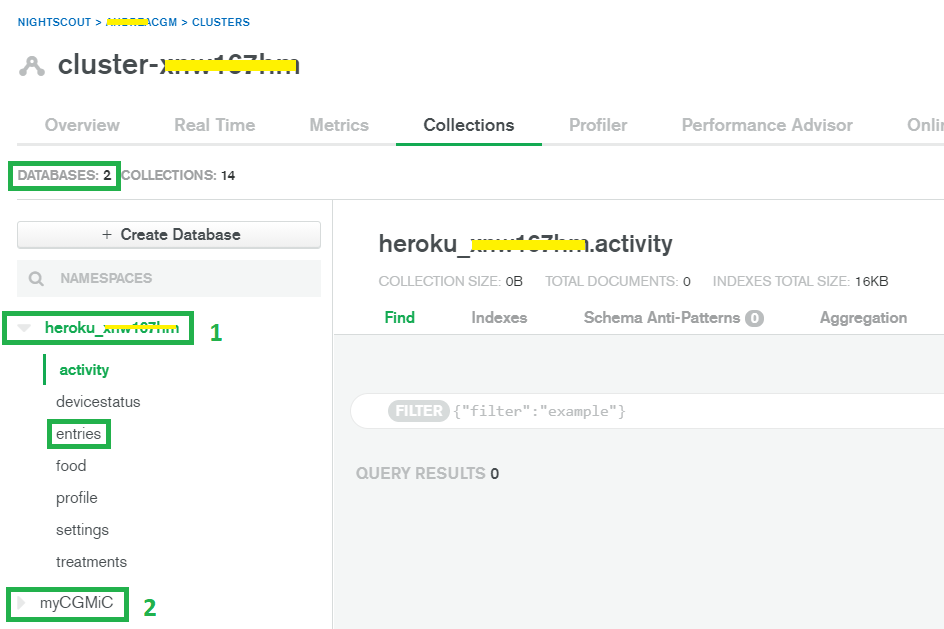
You can then move to your project (select it) and check its database(s) selecting COLLECTIONS
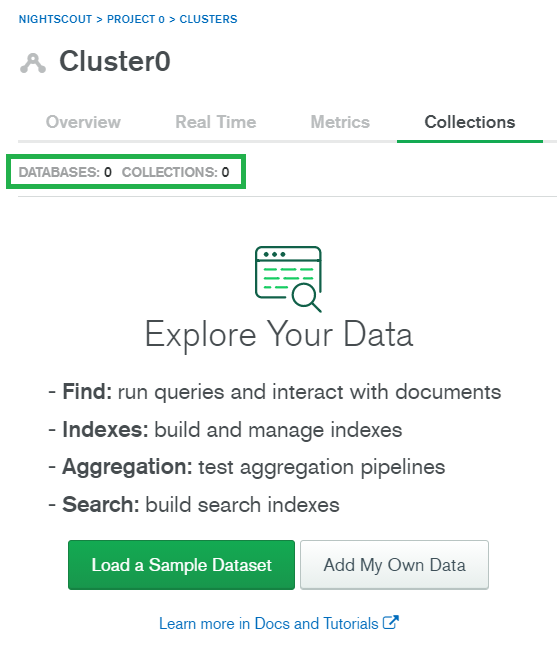
An empty project will look like below, and this is typically what you have before deploying Nightscout. Once Nightscout is deployed in a project, a new database will be created there.
The database currently used by your Nightscout is the one specified in the connection string, in the example below dbname. Whenever you change the database name in the connection string, a new database will be created in your project.
mongodb+srv://atlasusername:atlaspassword@cluster0.zzzzz.mongodb.net/dbname?retryWrites=true&w=majority
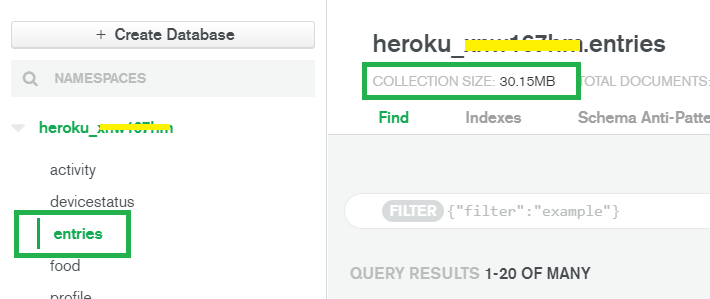
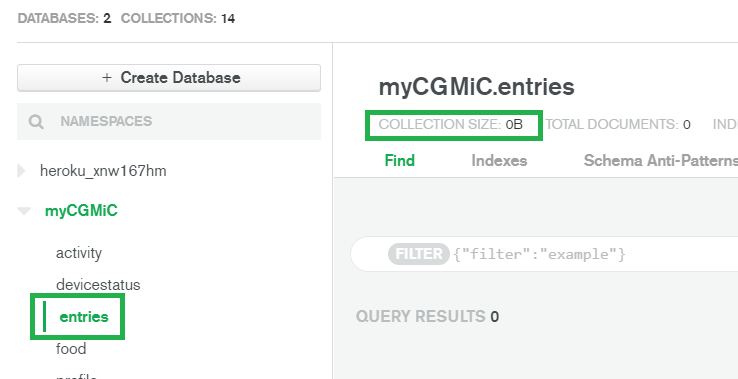
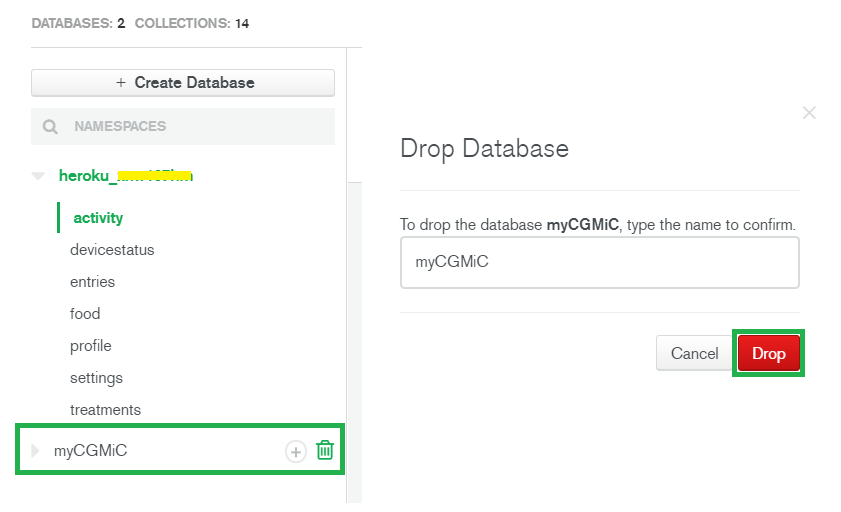
There is usually one database for Nightscout, if there are several, select one and then the other(s) to understand which one contains your data. For this, select entries.
A large database is most probably one you want to keep.
You can safely delete empty databases (check the size first).
Warning
If you’re not sure you’re deleting the right database, just leave it.
Hover on the database name and click the bin icon. Confirm deletion by copying the database name and click Drop.
If your database gets recreated after you deleted it this means your MONGODB_URI or MONGO_CONNECTION string is pointing to it.
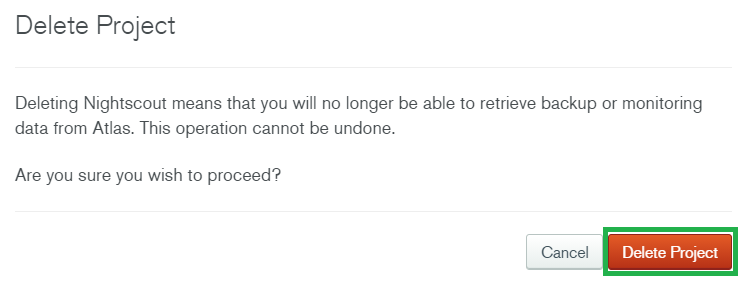
If you want to delete a non-empty Project you need to terminate all clusters belonging to it.
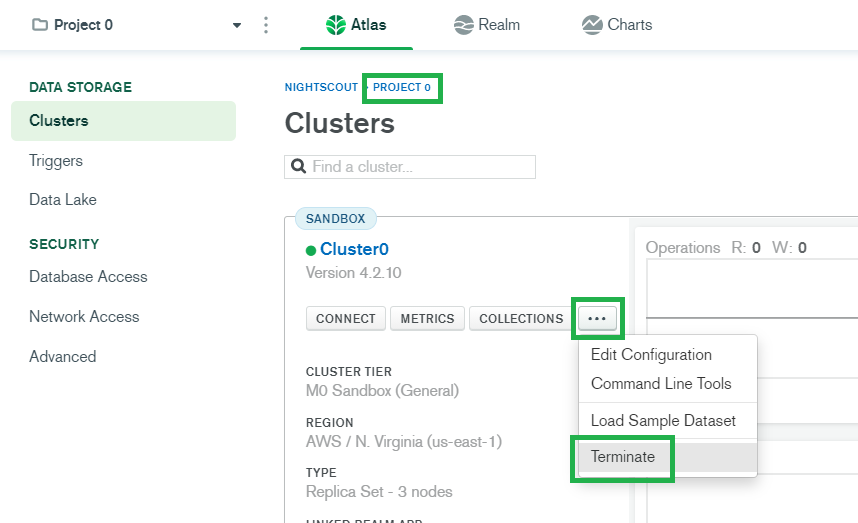
Warning
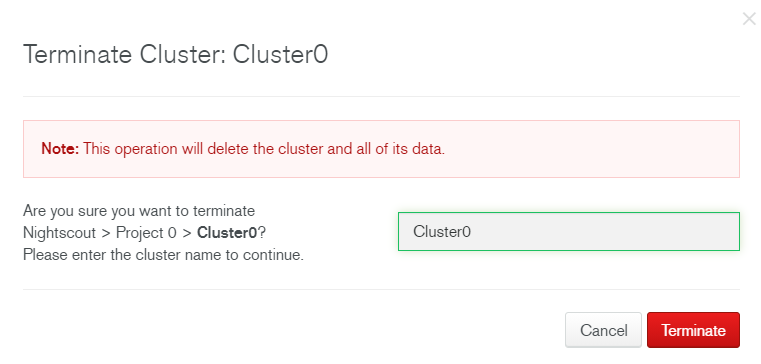
Terminating a cluster will delete all information and databases in this cluster!
Confirm with your cluster name and wait until shutdown is complete.
You can then delete the empty project.
Backup your database
Not a normal operation
Making a backup of your database is either a good idea or necessary if you want to migrate it to another database. This is not an easy operation and requires command line instructions using a computer.
Install the database tools
Follow this link to install the CLI tool on your computer.
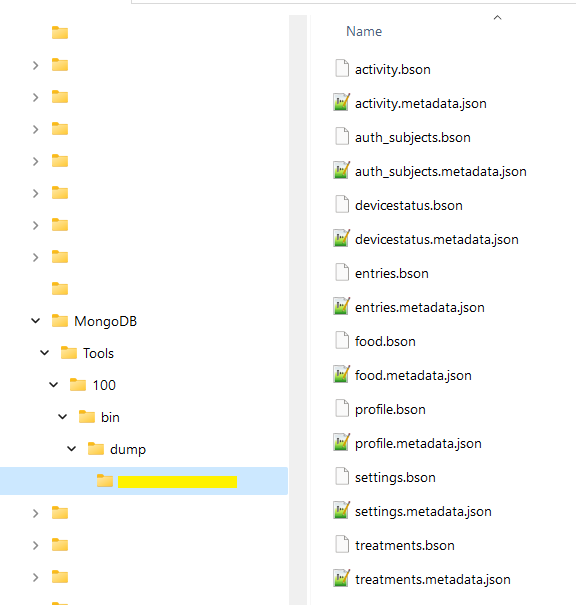
Dump your database
Get your MONGODB_URI handy to find the missing pieces (password and database name).
Log in your MongoDB account https://cloud.mongodb.com/.
Select your organization
Select your database
In the advanced options menu, select
Command line tools
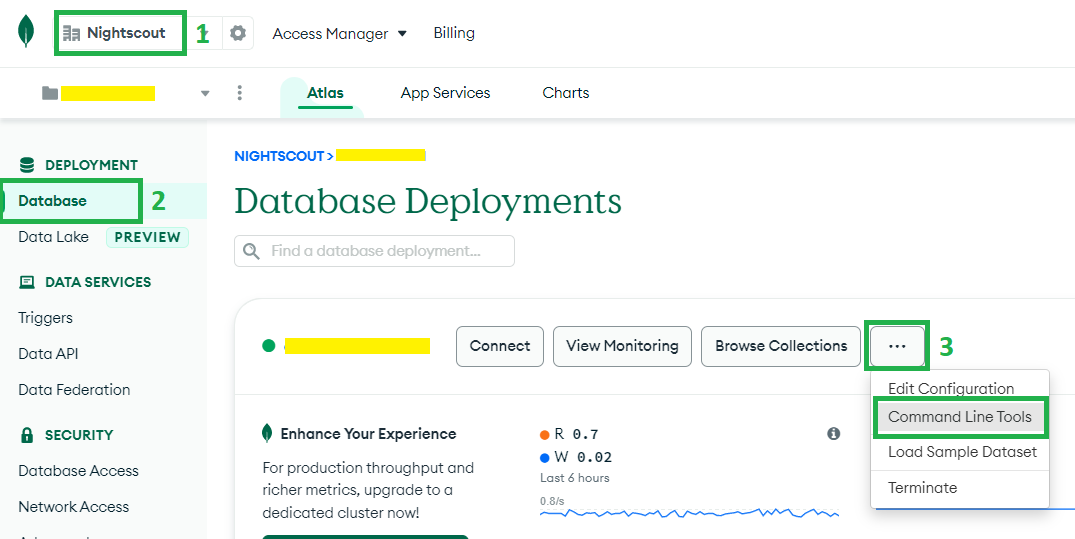
Scroll down to Binary import and Export tools, copy the mongodump command line.
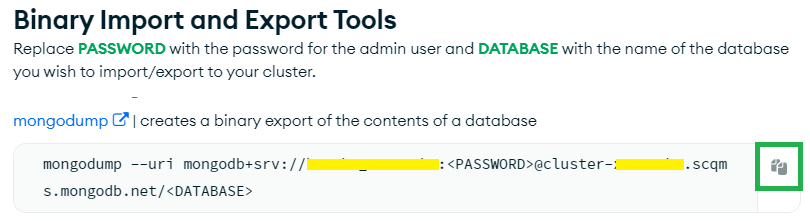
Paste the command line in a text editor.
Look into your MONGODB_URI and replace <PASSWORD> with your database password and entually (if you have one) <DATABASE> with your database name.

Open a command line utility (CMD, Terminal, …) and make your way to the utility folder (if you don’t want to include it in your system path).
For example in Windows 64bits it’s in C:\Program Files\MongoDB\Tools\100\bin.
Copy and paste your mongodump command, run it.
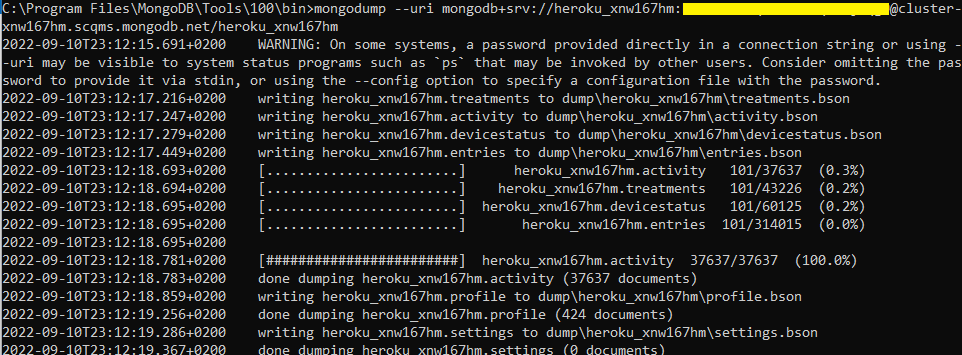
You will find the database dump in a subfolder called dump with your database name in a subfolder.