New Nightscout Users
”What is great is there will be multiple options for those interested in setting up the system! #wearenotwaiting” J.A.
Vendors
Note
Hosted services include everything: platform, database and support.
You can use a hosting provider that does all of this work for you in exchange for a monthly fee. There are many options available for this. If you’re a non-technical person, this is a great choice.
Building Nightscout DIY in a cloud platform
You can run your Nightscout site in several vendors platforms, using free or paid accounts.
Below is a list of most used platforms. There are probably others, don’t hesitate to open an issue in the documentation with the easiest deployment method if you want to see them named here.
Basic concepts
Even if knowing how it works is not mandatory, it is very useful to understand a few background concepts before starting DIY Nightscout.
The code available open source in GitHub or packaged for you in Docker is the set of instruction that will be used to make your Nightscout. You don’t need to understand it or be a programmer to use it.
Your Nightscout will usually be running a web application in the internet cloud, meaning that somewhere on the planet, a computer or another will spend some of its time to keep your Nightscout active. This is the engine of Nightscout: it will make sure to be ready to accept the data you will send to it (BG, treatments, …) or to answer to data requests when you ask them (BG, reports, …) and even send alarms when instructed to do so. You will not see the engine work but you will see its frontpage: the web URL of your Nightscout site, which will be available on any device connected to the internet.
Since you will need to store a lot of data, Nightscout must have a database. This database will also be in the cloud, meaning data will be stored on one or more computers, somewhere. The Nightscout engine mentioned above will store and read data from this database whenever required.
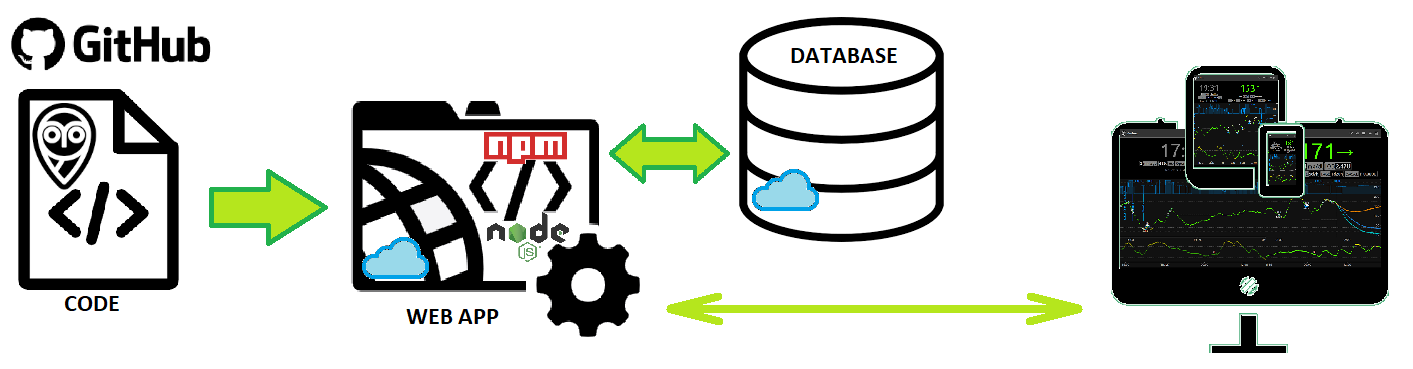
From this you understand there are three main pieces necessary to build your Nightscout:
The Nightscout code also known as cgm-remote-monitor
A cloud platform running the Nightscout web app
A cloud database storing Nightscout data
Some platforms offer both engine and database like Azure, Railway, Northflank and all VPS servers. But you can use an external database if you want. Some others like Heroku or Fly.io don’t propose a database and require you to use an external one. Traditionally the database holding Nightscout data is hosted by another provider (mLab, now MongoDB Atlas) but it might not be the most reliable solution.
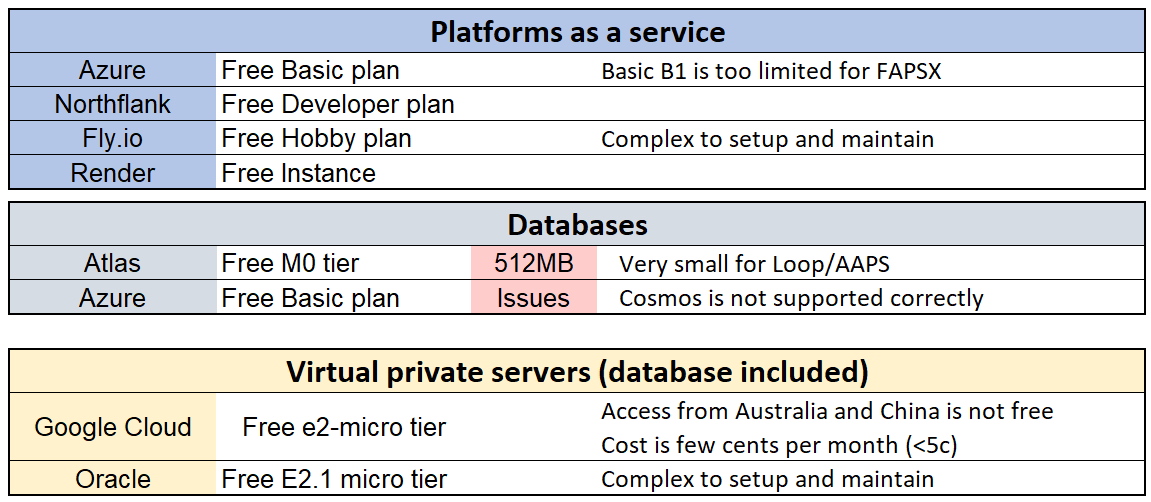
Free DIY
These are the current solutions not involving, or limiting to a strict minimum, costs.
Note
Most vendors will require a credit card to authenticate users and avoid abuse.
Azure, Northflank, Render, Atlas, Google Cloud, Oracle
Hardware DIY
These solutions require specific hardware (they are not cloud based).
Whilst it’s not recommended to purchase the hardware for this purpose, if you own it you might consider this option.
You can setup Nightscout on your NAS, Home Assistant, Raspberry Pi 4 computer, and on some Amlogic based TV boxes following these instructions.

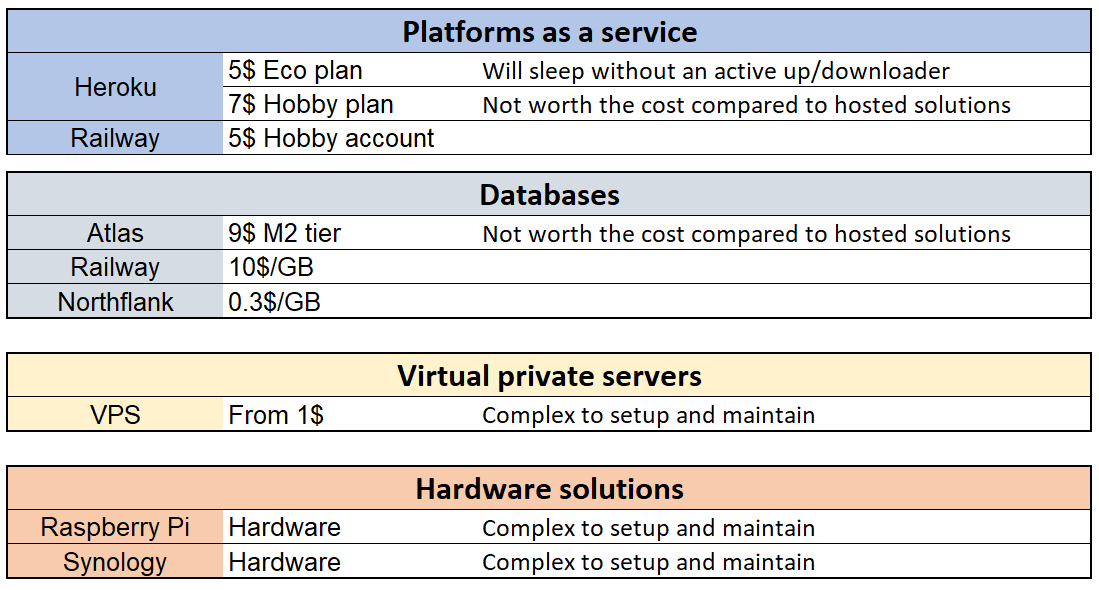
Paid DIY
These solutions will or might require a monthly fee.
Consider the costs against a hosted solution including maintenance and support.
Note
Paying for a platform doesn’t imply your database is included and covered by the plan.
Heroku, Railway with or without a database, Fly.io, Northflank database.
Security and safekeeping
Do not use the same password for all your accounts, and choose passwords that are not easy to guess.
Do not use the
API_SECRETfor the Atlas database password.Do not use your Dexcom or CareLink user name or password for Nightscout components.
Do not share the
API_SECRETor other passwords of your accounts to others.Do not use Nightscout or any related applications on rooted and/or otherwise compromised devices, and ensure you always have the latest operating system and virus protection updates installed.
If you want to read more about Nightscout security, including about additional configuration options to make your installation more secure, please check our security guide.